If your organization has configured your Webex App account to let you call other people’s phone numbers, you can call anyone who has a phone number. When you call like this, it’s just like making a regular phone call from any other type of phone. If you want to call your favorite restaurant to make your lunch order, call them right from the app, and place your order.
When you’re on a phone call, you can pull someone else into the conversation without having to schedule a meeting. The Webex App is video capable, so you can share your video when you initiate the conference call.
You can add people to the call only if you’re set up with a calling service such as Unified CM, Webex Calling, or your calling is hosted by a service provider. If you’re not sure what you’re set up with, you can find out what calling service you have.
The number of people you can add to a call depends on your calling service. If you’re set up with Unified CM or Webex Calling, the number of people you can add depends on how your administrator has set up conferencing resources for you.If your call is hosted by your service provider, the number is determined by your service provider (which can be between 3 and 15).

You don’t have to worry about missing important calls. If someone calls you and you’re unable to answer their call, they can leave you a voice message. You see a red badge counter letting you know how many messages you have. You can then check your voicemail directly in the app.
Set up your PIN:
Depending on the calling service you’re set up with , you may require a PIN to access your voice messages or features, such as creating a personalized greeting, sending a message, and more. The way you go about setting up your PIN, depends on your calling service:
1. Unified CM
2. Webex Calling or Calling hosted by a Service Provider.
Listen to your messages:
You can listen to your voice messages right from the app and what you do with them after that depends on your calling service.
Missed a call in Webex App and want to see who it was? Or, you might need an easy way to get back to someone you’ve talked to before. Go to your call history, where you can see up to 200 of the calls you’ve made, received, and missed in the last 30 days.
You can see if someone called you from their work or mobile number, and then call them back at the same number. If there isn’t a number under the person’s name, it was a Webex app call.
When a call is forwarded or redirected, the Webex App shows information on the caller, and where it was forwarded or redirected from. This includes calls forwarded or redirected from hunt groups, call center queues, and executive assistants.
If you’re set up with Webex Calling or your calling is hosted by a service provider, your call history synchronizes across your desktop and mobile apps as well as your desk phone.

Make it easy to connect with the people that you contact the most. You can create a Contacts list, add up to 500 contacts of your choosing (including contacts that are local to your device), and then group them and customize the contact information.
While you’re on a phone call with someone, you can put them on hold so that you can make or answer another call or get more information.
When you’re on a phone call, you can transfer that call to someone else, and if you’d like, let that person know why you’re transferring the call to them.
If you’re going to be away from your desk but don’t want to miss an important phone call, you can forward your calls to another phone number. Or, if you don’t want to be interrupted, you can send all your calls to voicemail instead. If you forward your calls to another number, you won’t get called in Webex App anymore. So, be sure to turn call forwarding off when you’re ready to take calls in the app again.
Don’t worry about missing that important phone call because you have to step away from your desk. You can have your work calls ring any phone number so when you get a call, Webex App rings, plus any other numbers you set up. Using just a single work number, people can reach you wherever you are.

When you’re on a phone call with someone in your company who’s also using Webex App, you can share content and everyone can see what’s being talked about. Webex App suppresses notifications for incoming messages or calls when you’re sharing content.

You can move an active call from your desktop app to your mobile app and take your call on the go. Or if you were already on the go with a call and you return to the office, you can move the call from your mobile app to your desktop app.
If your administrator has set you up as an Assistant with the Executive Assistant feature (also known as Boss-Admin), you can make and answer calls on your boss’ behalf. If you have more than one boss, you can select the appropriate line when making a call. And you’ll always know which boss an incoming call is intended for.
Choose one of the following options:
1. Make a call—Go to your active line , choose your boss’ line from the list, and then proceed with a video or audio call. The lines are easily identifiable by the associated phone numbers and descriptions. Make and answer calls on your boss’ behalf with Webex.
After you make your selection, every outgoing call you make uses your new active line. You can change the active line again at any time.
The call is made using your boss’ caller ID.
2. Answer a call—When you have an incoming call, the notification includes a description that lets you know the call is intended for your boss. You can choose whether to answer or decline that call. After you answer the call, you can handle the call the same way you’d handle any other call. For example, you can make it a conference call, screen the call and then, if appropriate, transfer the call to your boss.
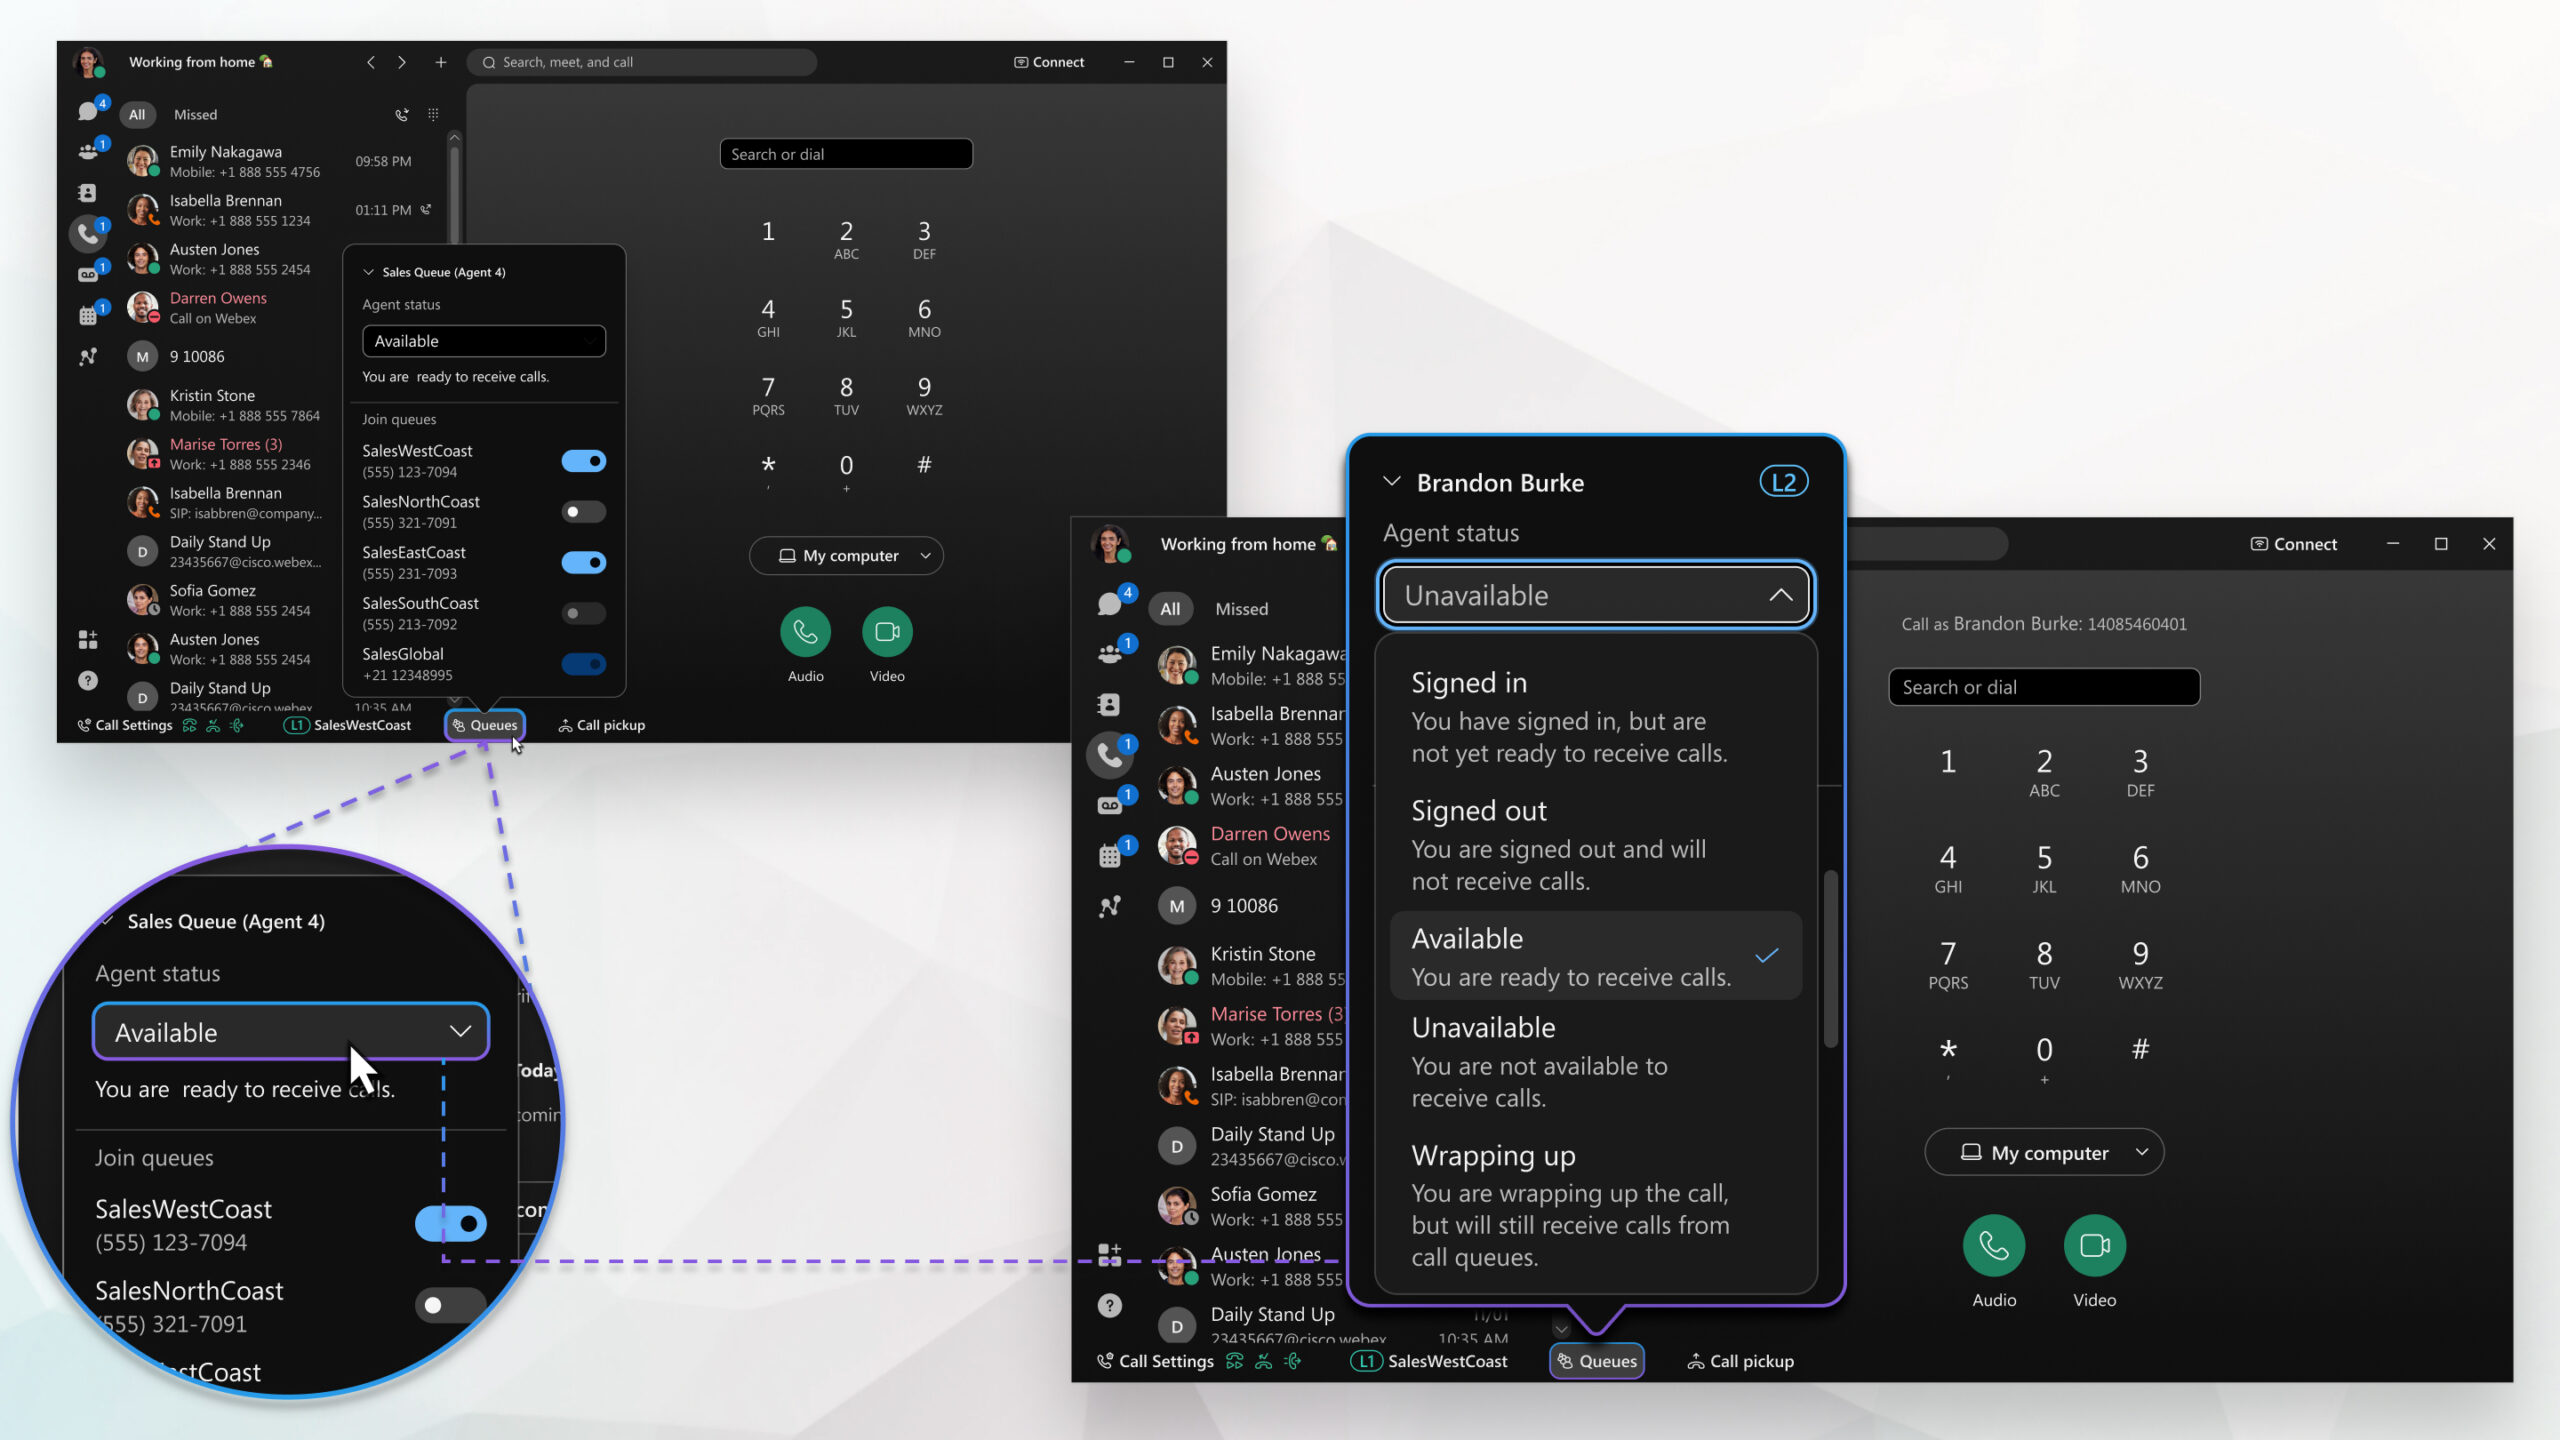
When your administrator makes you a member of a call queue, you can check and change your call queue status in Webex App.

Your administrator determines how much control you have over recording your calls. Depending on your setup, your incoming and outgoing calls may be recorded automatically, or you may be able to decide which calls you want to record. You’re presented with a visual indicator letting you know when a call is being recorded.
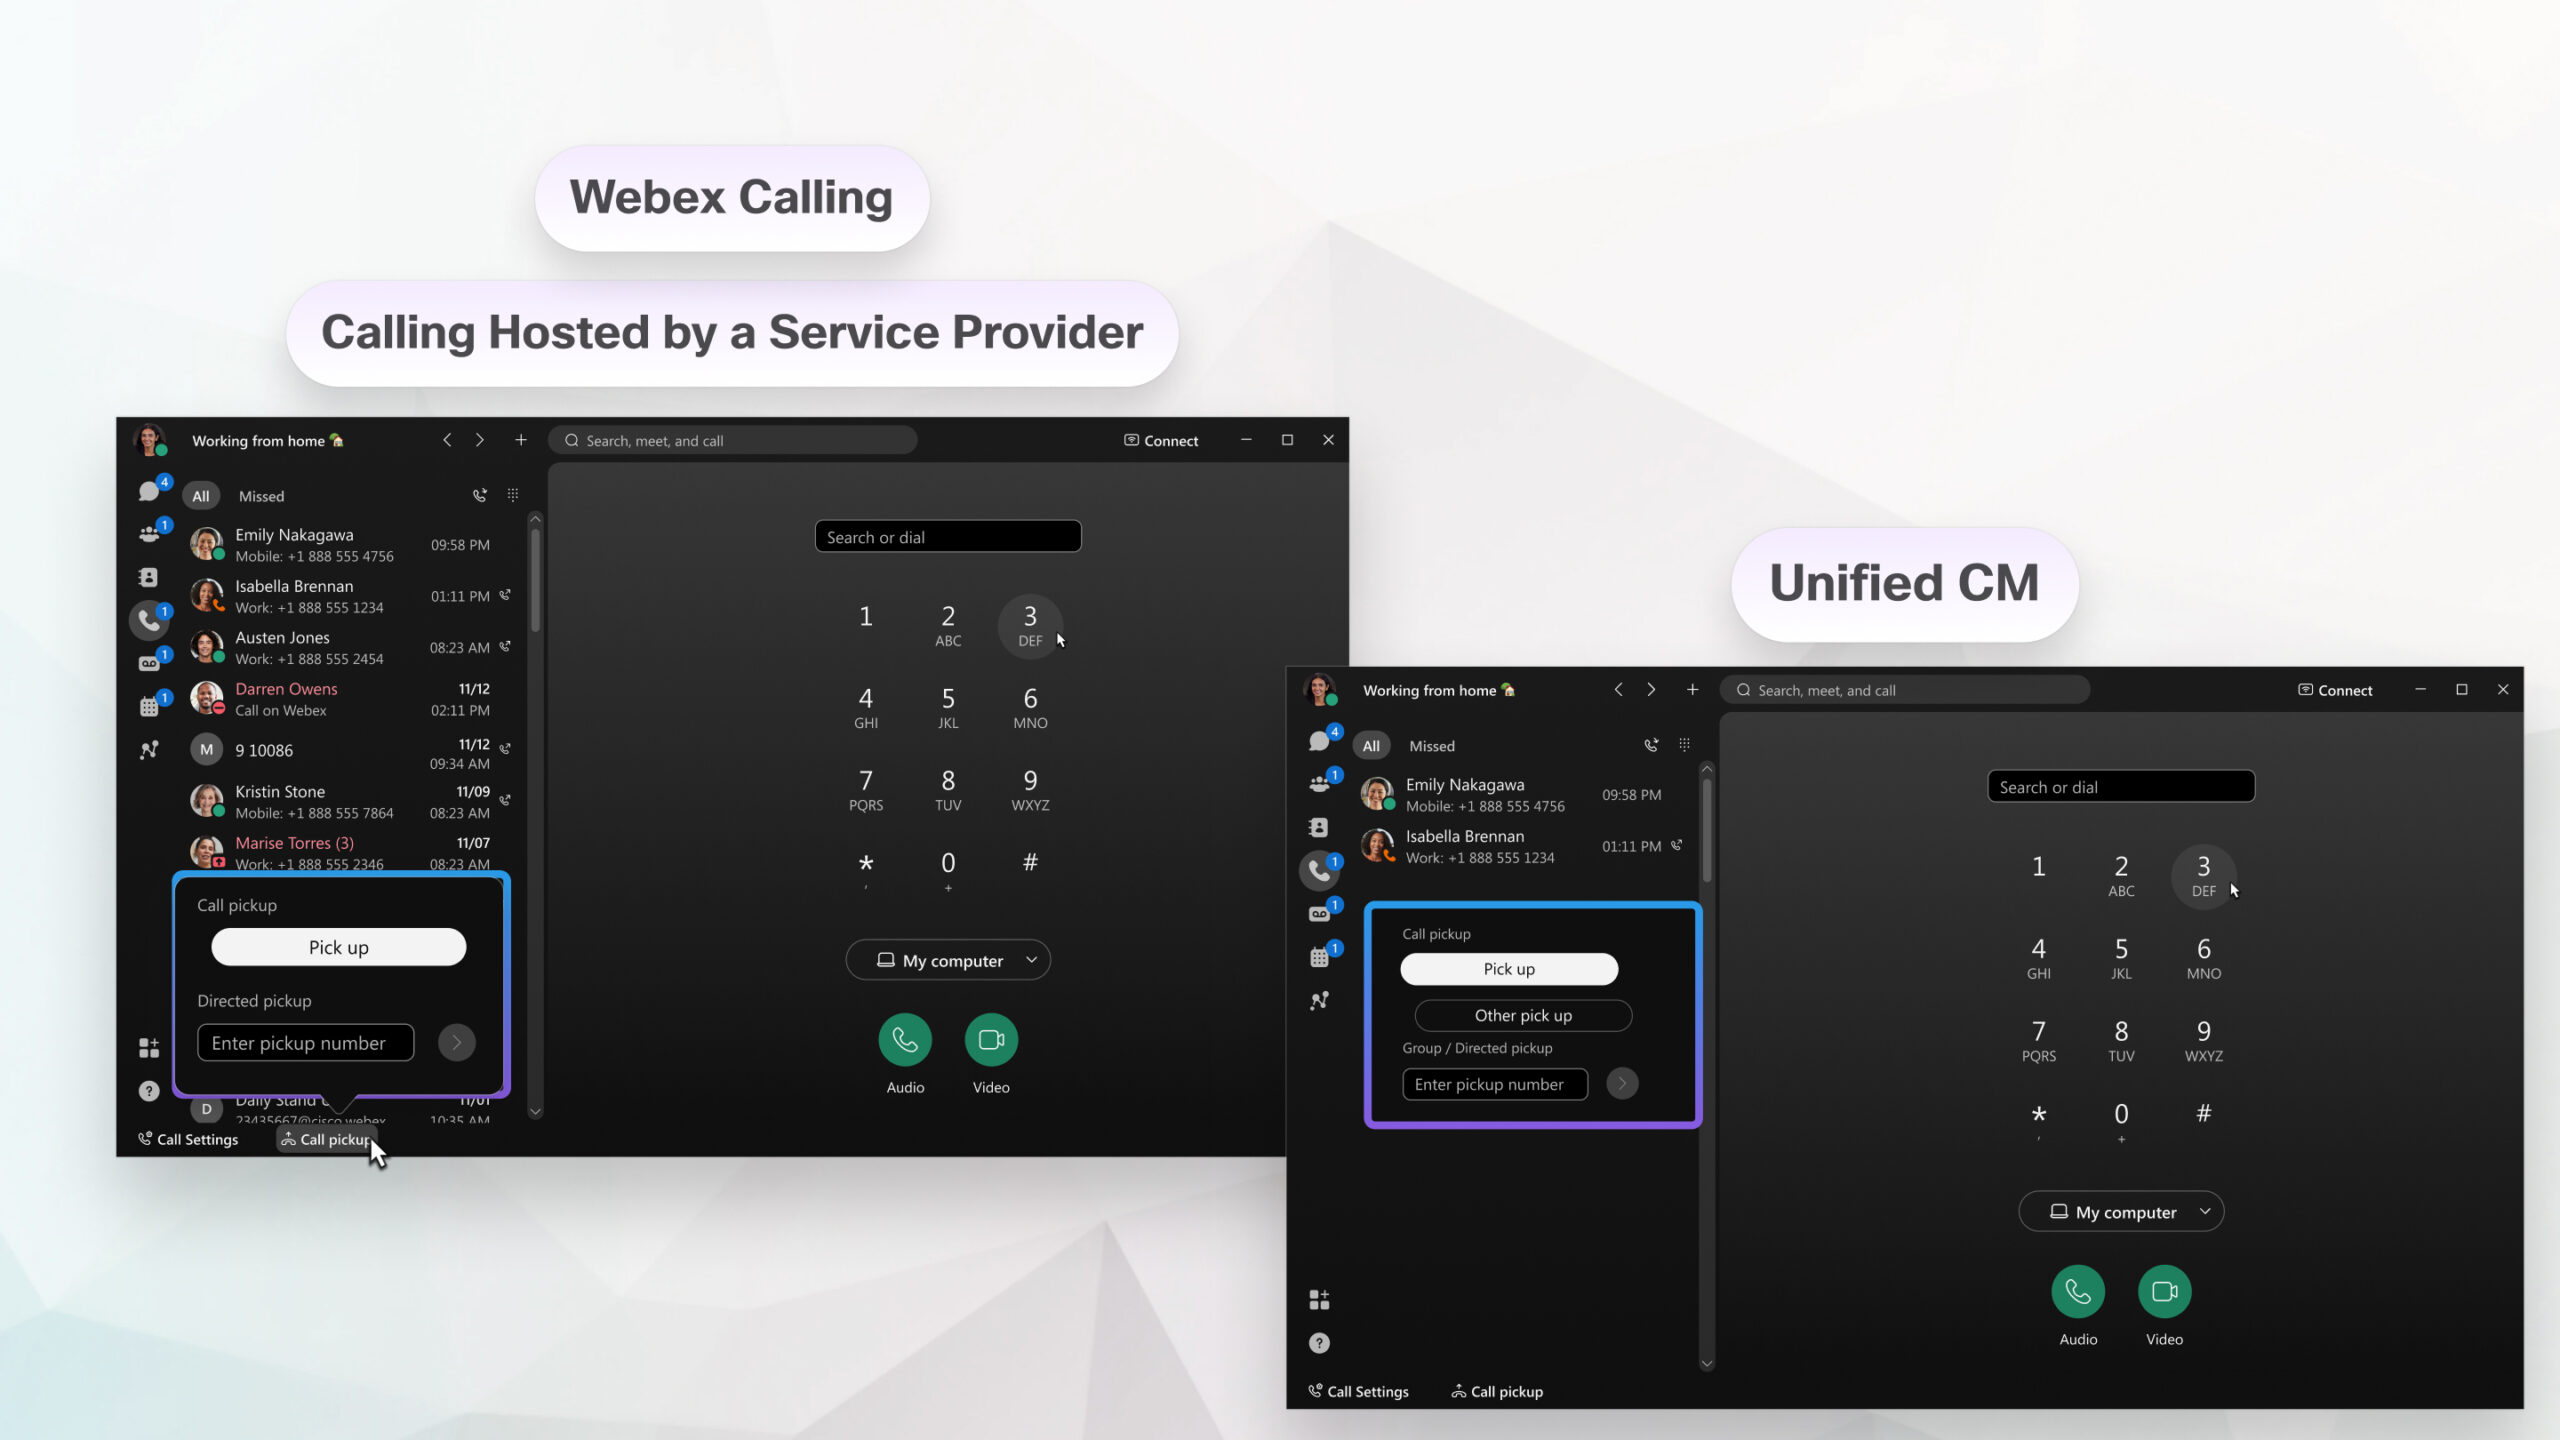
Help someone out with their incoming calls. When your administrator makes you a member of a pickup group, you can hear or see when someone on your team gets a call. If your coworker is busy, answer their call for them. How you pick up that call depends on the calling service you’re set up with: Webex Calling, Calling Hosted by a Service Provider, or Unified CM.
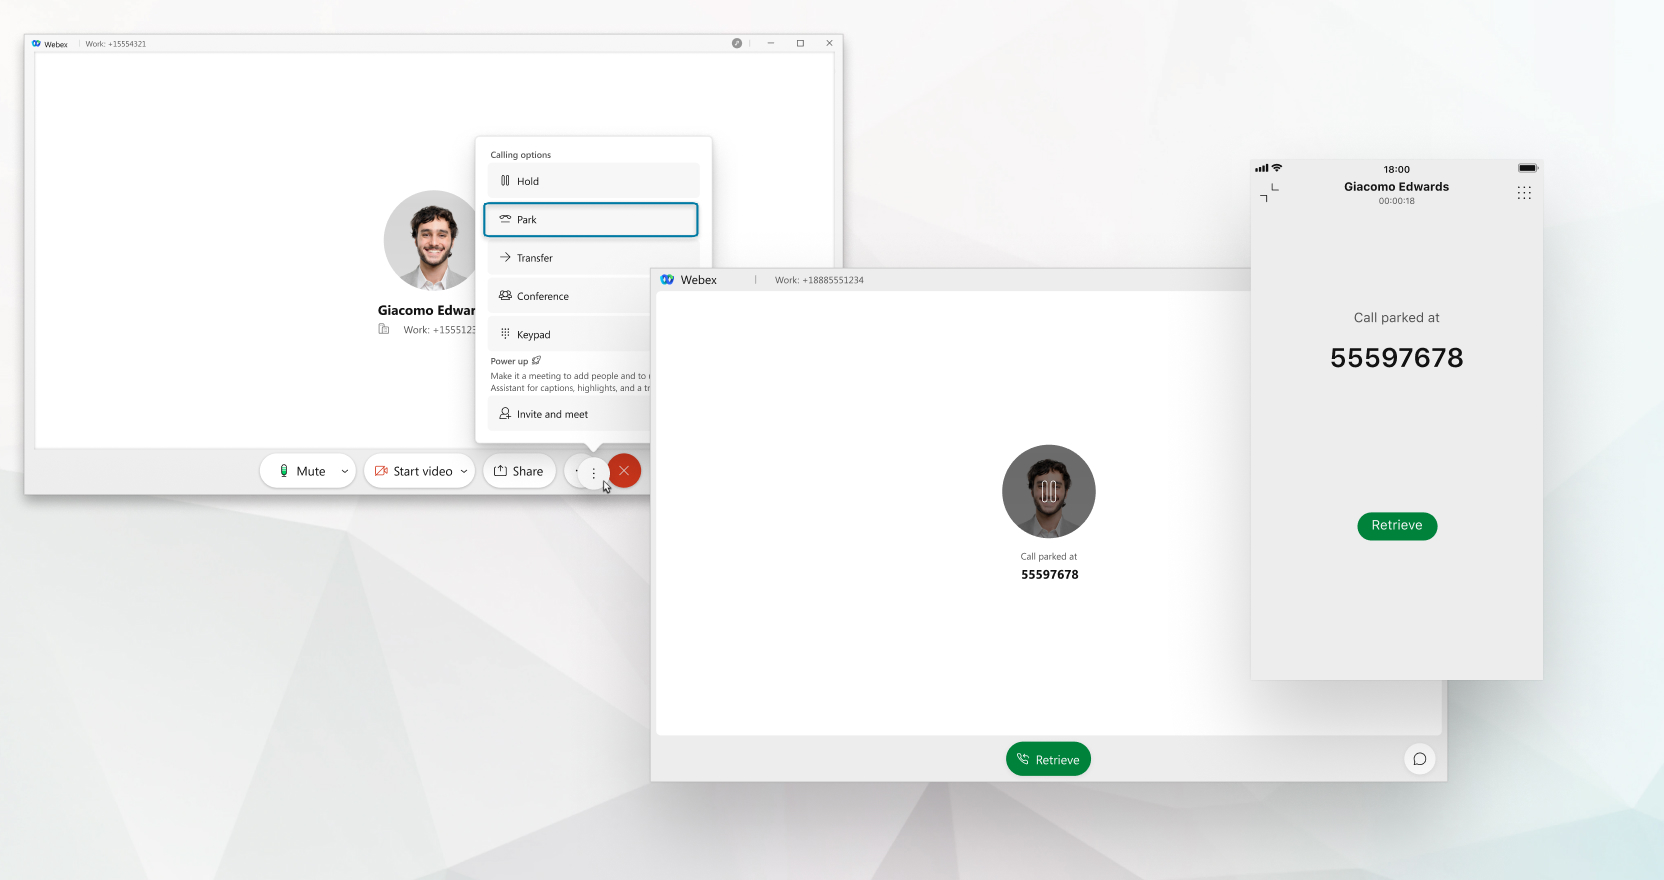
If you’re part of a call park group, you can park an ongoing call. When you park a call, the call gets assigned a parked number that’s not your phone number. You can then use that parked number to retrieve the call from another device. Or you can share the number with people in a different department so that one of them can retrieve the call from their own device.
In Webex App, all your work takes place within spaces and teams. Here you can send messages, make calls, have video meetings, and share files and whiteboards.
Direct Messages
You send a message directly to one person. The conversation that you started remains between the two of you, and you can’t add other people to the conversation later.
Spaces
Spaces work well for a group of people working on a specific topic. You come together to handle this thing (which can be something quick or long term), but the focus is more narrow and specific. You could also hear these referred to as standalone spaces.
You can join a space when someone who’s already in the space adds you to it.
Spaces start out unmoderated, which means anyone can do things like add or remove people, or change the name and picture. But if you need more control over who’s joining, you can make yourself a moderator of a space. Then, only you can add people to the space, and you get other privileges like being able to delete people’s messages or files.
Space Sections
Organize and manage all your spaces into sections that you create. For example, easily drag and drop spaces to sections, to keep specific project work spaces together. Expand and collapse sections to give your space list a clean look.
Public Spaces
Public spaces are spaces created within your organization which are easily discoverable. Discover, join or create public spaces and connect with people with similar interests, or keep up with the latest news. Public spaces are different from other spaces, as they aren’t tied to a specific team. Anyone in your organization can find a public space that you create. If you change your mind, you can make a public space private again at any time.
Teams
If your original intention changes and that project outgrows its original purpose, you can create a team and then move a space into a team .
Teams help you keep everything organized by putting multiple spaces under a common theme. Teams are great for a consistent group of people who are going to be working on something for a long time. That something can involve many activities, or could be subprojects happening at the same time.
To join a team , a moderator must add you to it.
You can also connect the team with a Microsoft 365 group when you’re creating the team. You can then manage people in the team from Microsoft 365 and use Microsoft Sharepoint folders to save your files.
Every team has at least one team space, General . You’re automatically added to the General space when you’re added to the team. As a team member, you can view and join any unmoderated team space within the team. You can also create team spaces for others to join.
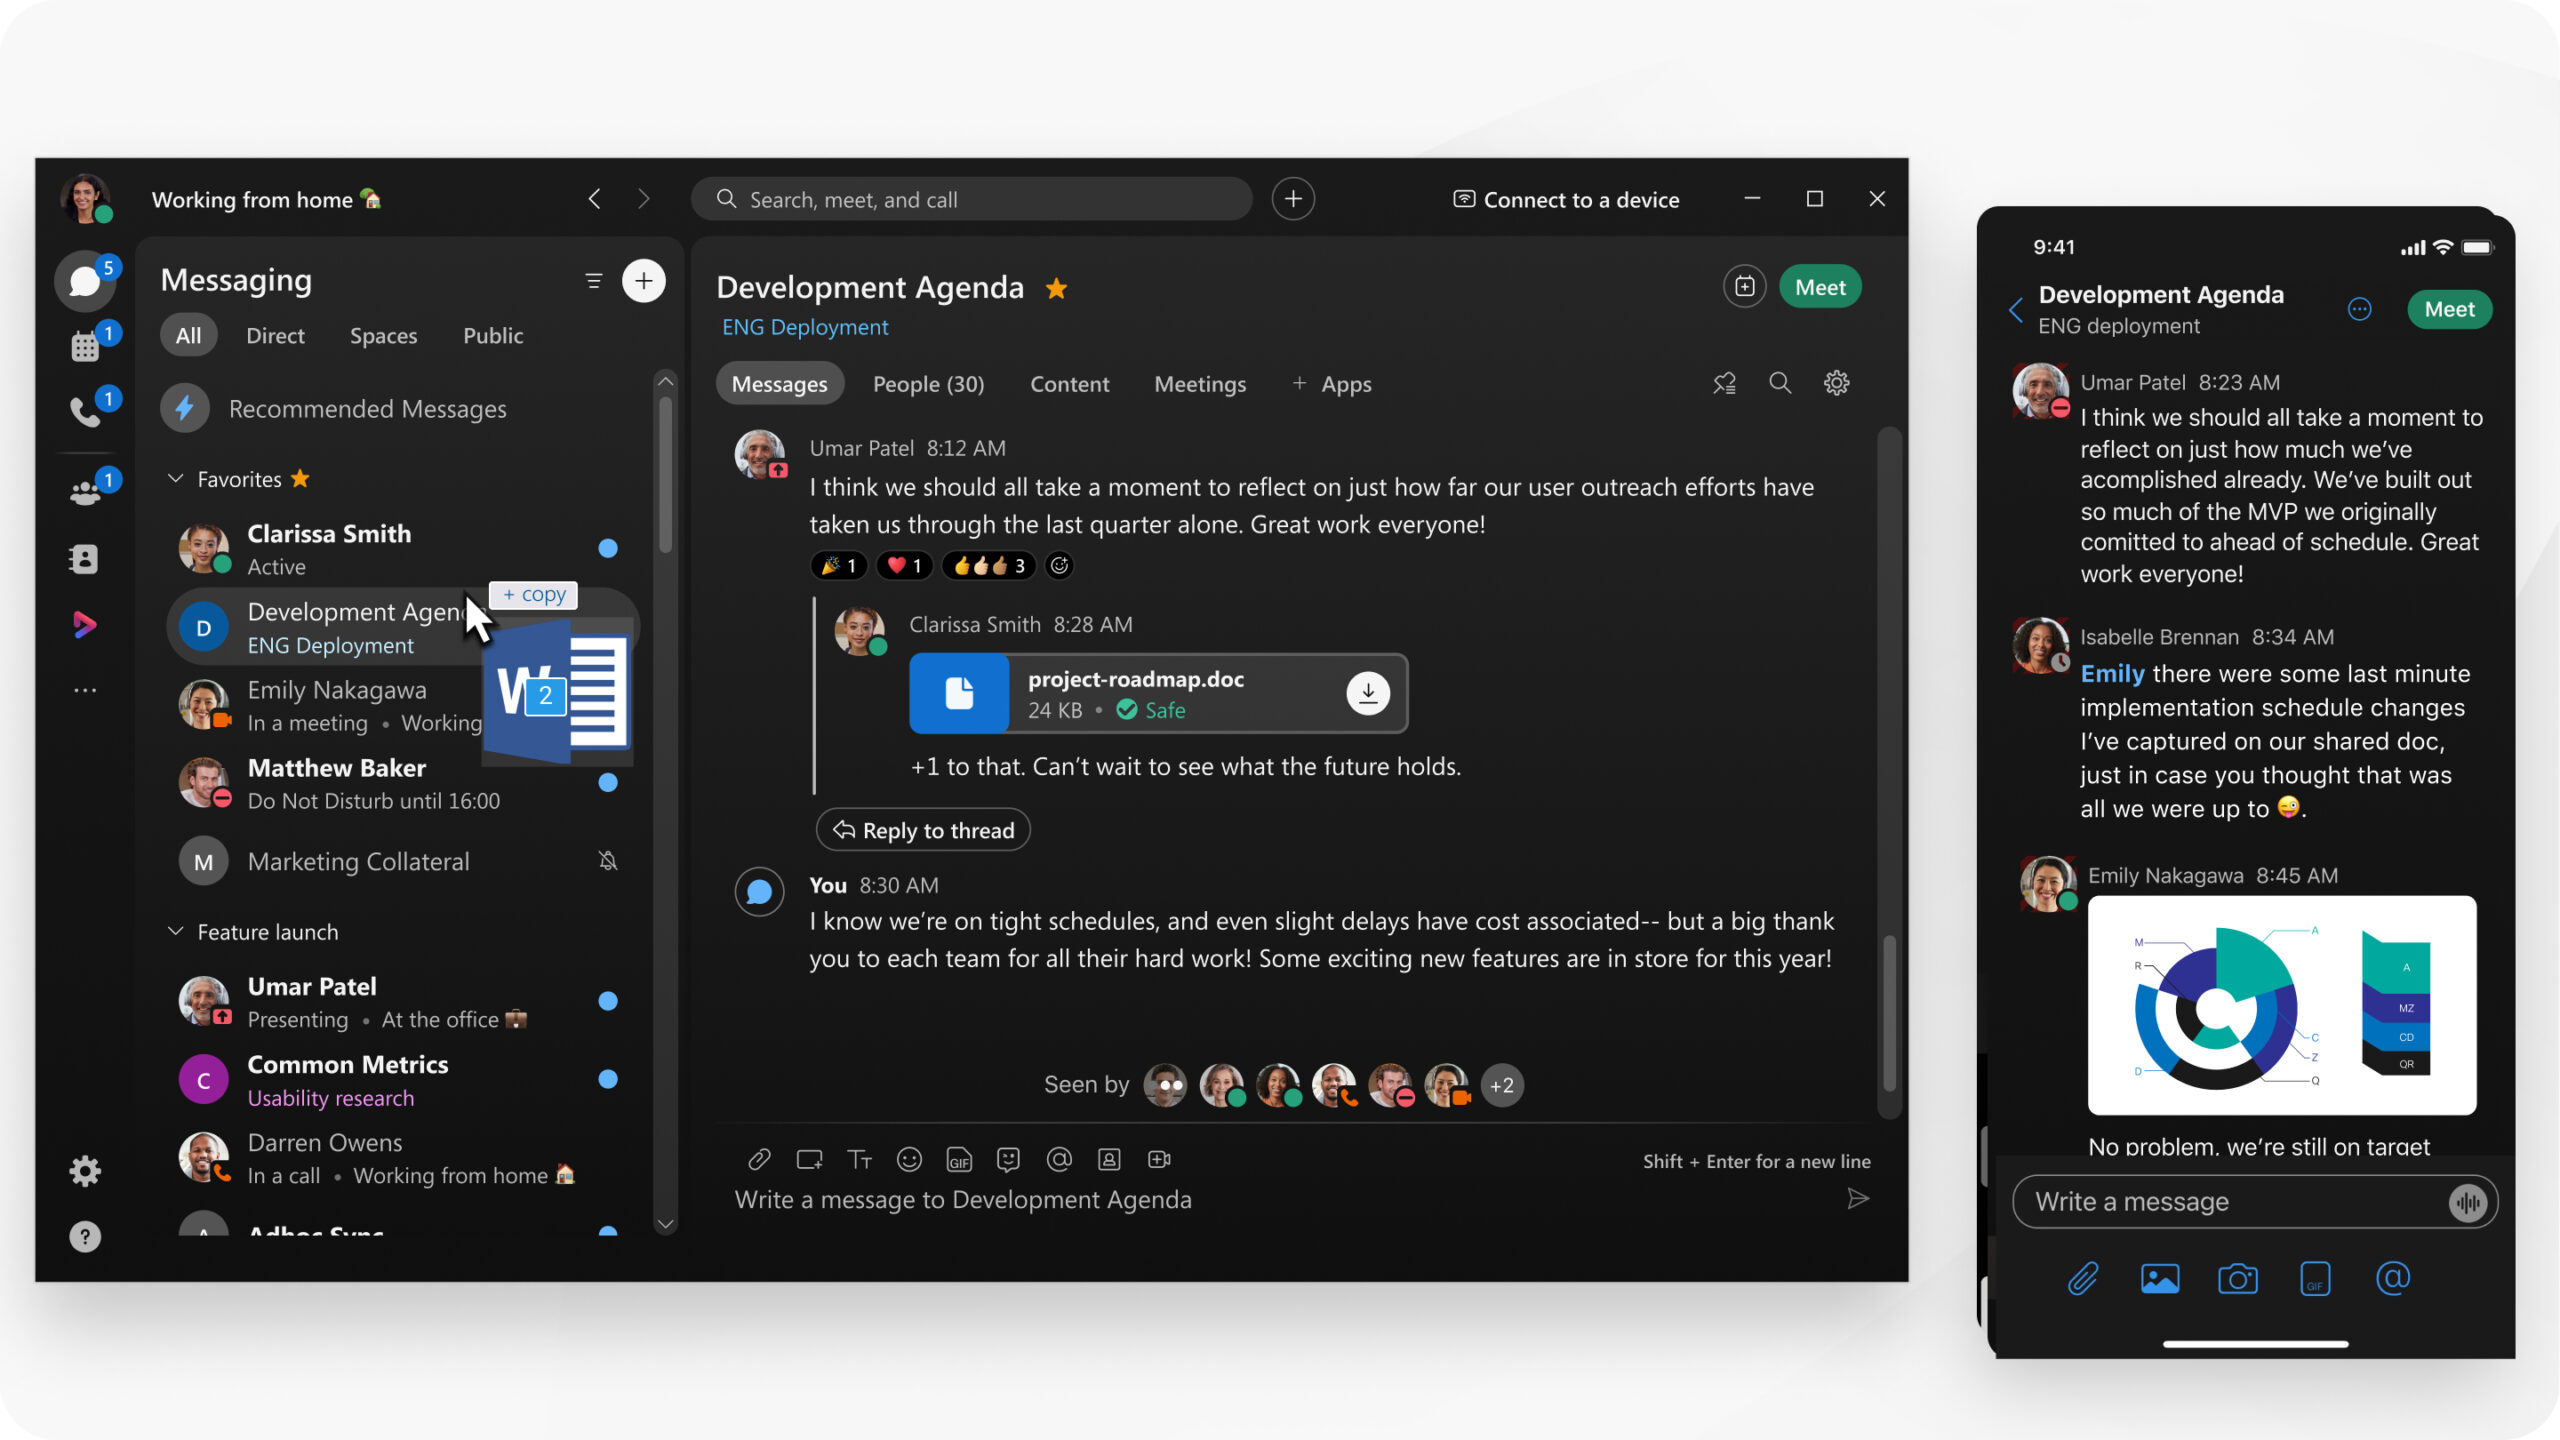
Add information and personality to your spaces by sharing files, attachments, photos, and videos.
You can share most types of files except for .tif files, and the largest file size that you can upload to a space is 2 GB. You can also preview documents without downloading them first if they’re no more than 50 pages and less than 100 MB in size, and one of these file types: .doc, .docx, .gif, .jpeg, .pdf, .png, .ppt, .pptx, .xls, and .xlsx
When you add animated GIFs, they’ll play automatically in the app if you keep their file size to under 2 MB.
When you share content in Webex App, everyone in the meeting can easily see what’s being discussed. Anyone can share content, but only one person can share at a time.
If you are a host or cohost of the meeting, you can disable sharing for all other participants during a meeting.
If you prefer, you can share a file, share only a portion of your screen, or share your camera.
You can see other people’s availability in Webex App. If you need to contact someone, check to see if they’re actively using the app. This makes it easy to know if others are available to respond to messages.
When people are using their computer, their availability displays as active in Webex App on Windows or Mac. When they’re away from their computer, Webex App shows when they were last active.
When people send or read new messages in the app, their availability displays as active in Webex App on iPhone, iPad, or Android. When they’re away from the app, Webex App shows when they were last active.
You can only see the availability of people in your organization. You can see someone’s availability information whenever you see their profile picture: when you send them messages, see them in a space, or search for them.
Webex App on Desktop, Mobile, and Web
The following is the availability information that you see on the profile picture on Webex App for desktop, mobile, and web, in the order of precedence in which availability states appear.
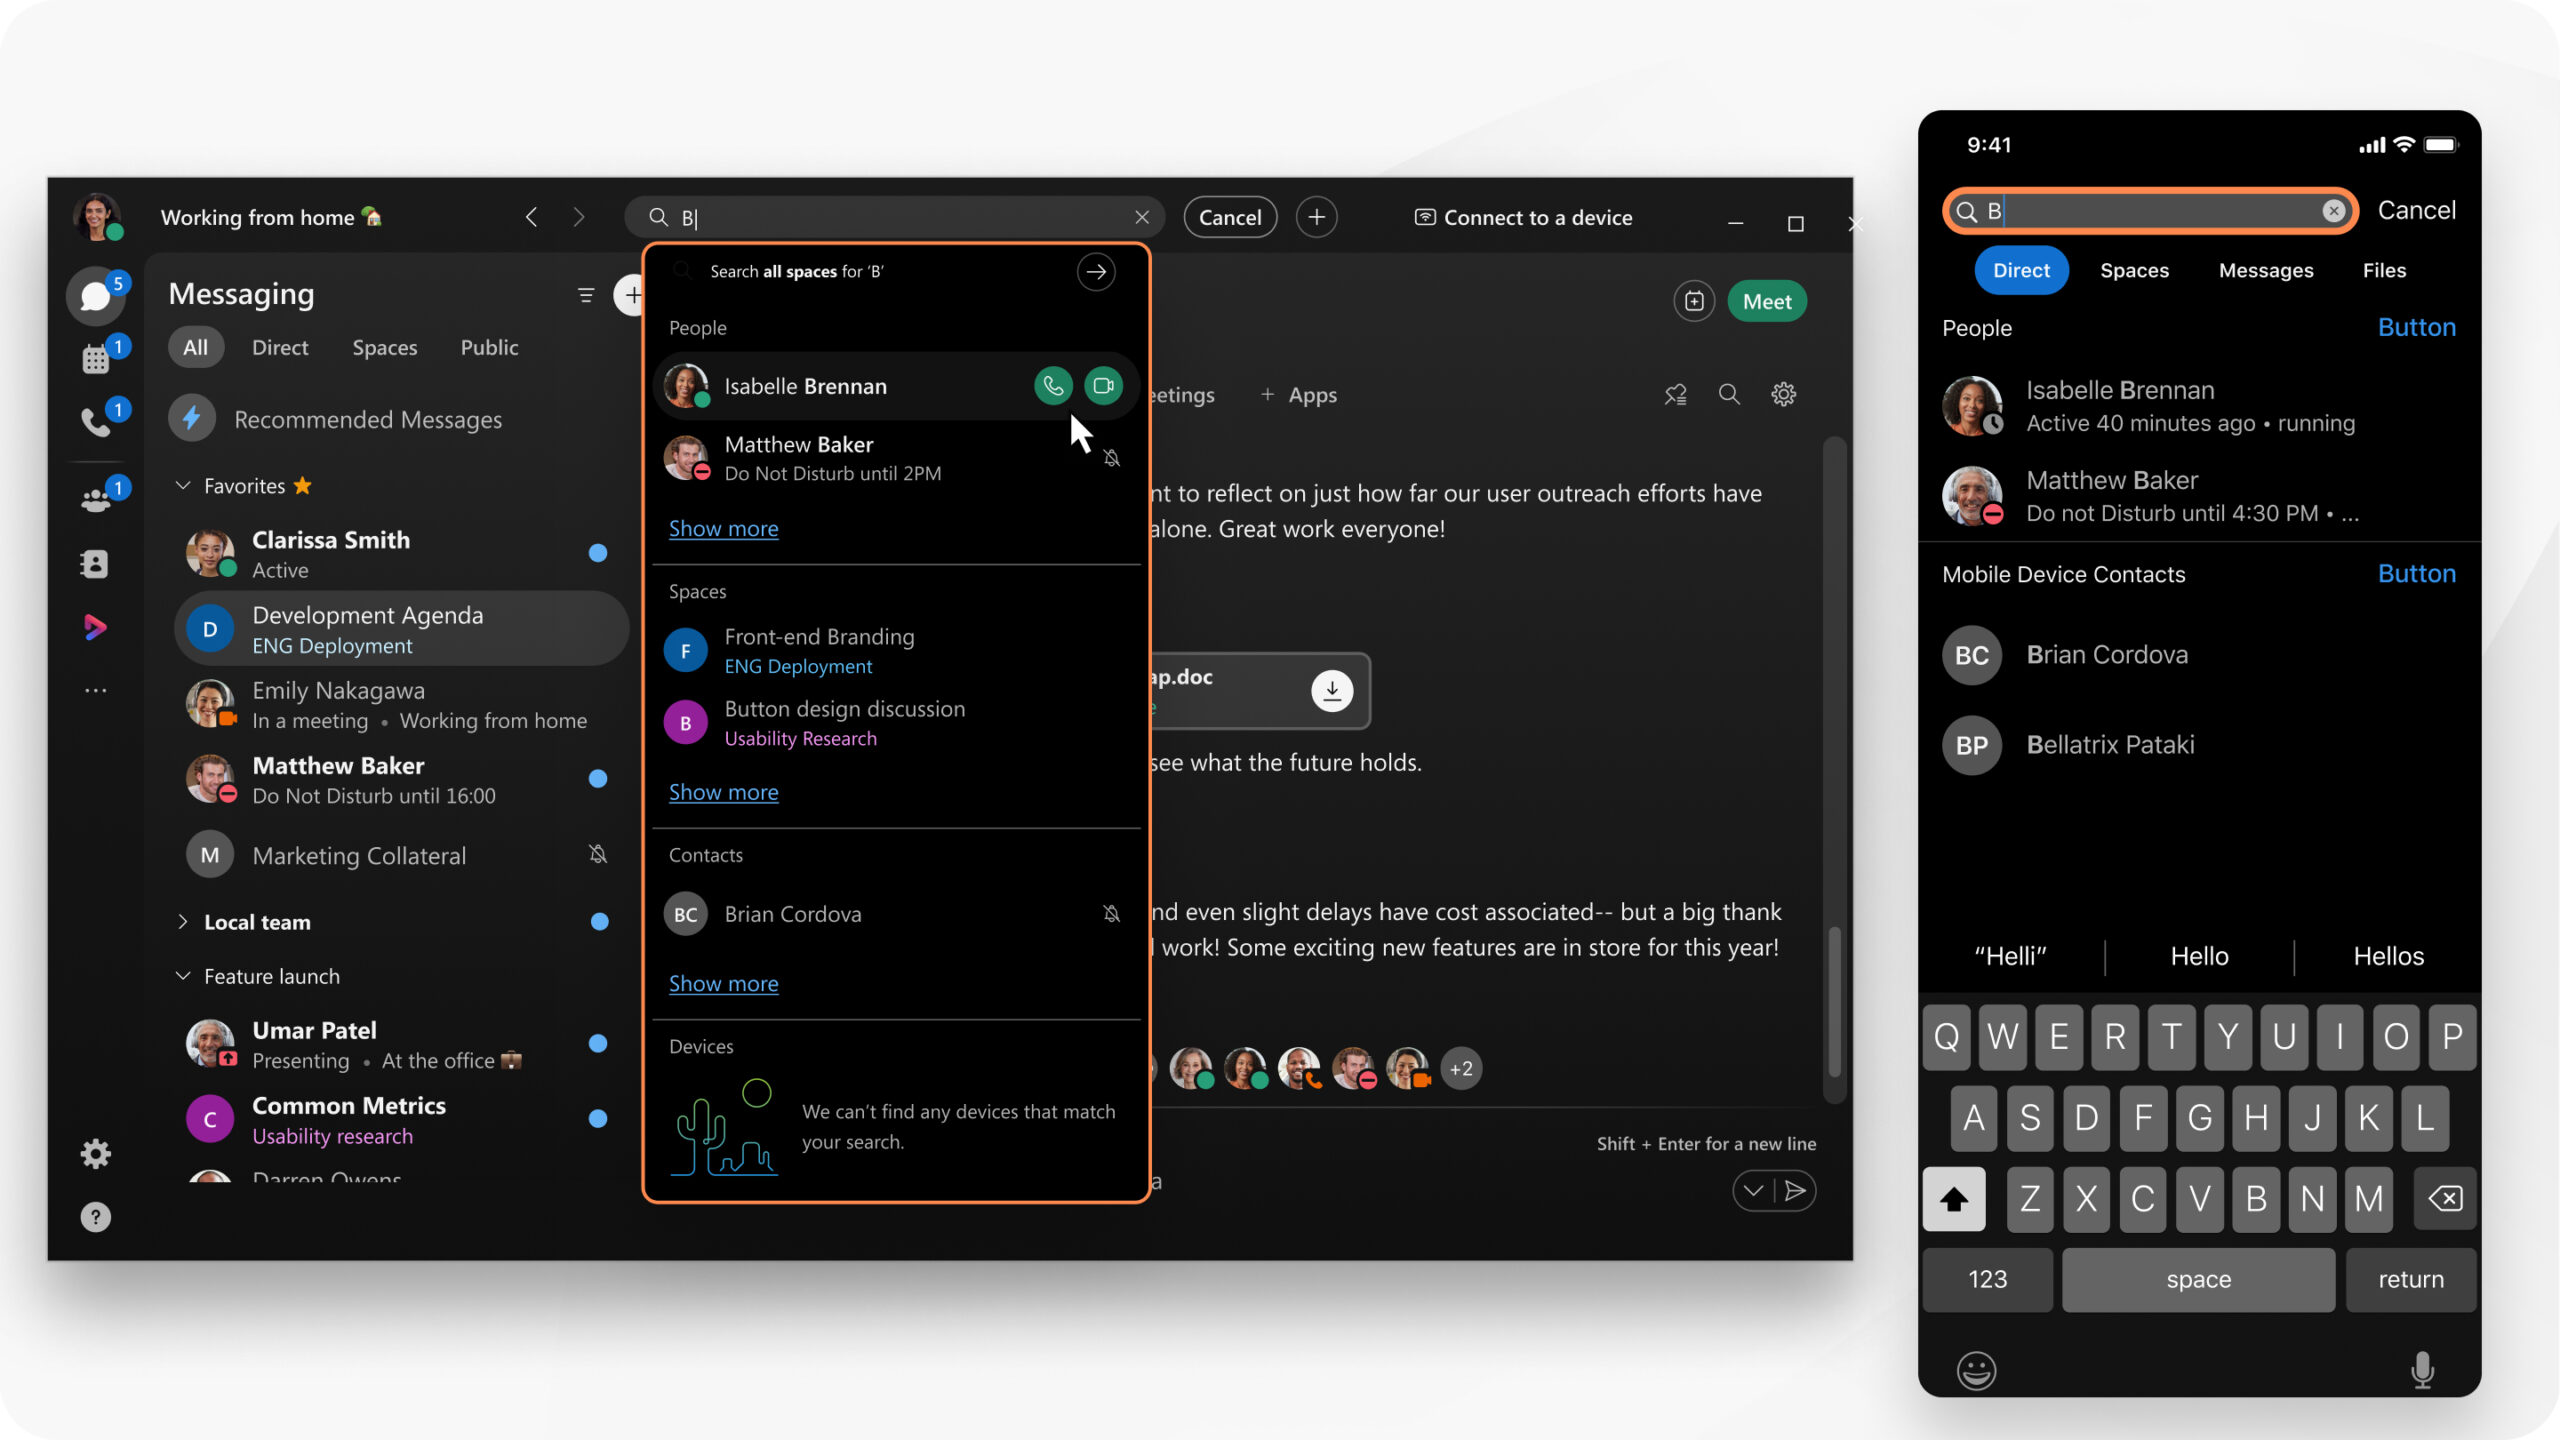
You can search through the history of your conversations in Webex App to find people, spaces, messages, files, and even devices. You can search on everything, including space names, or refine your search with filters, to narrow the results. And you can even make a call from the search results.
If your administrator adds external contacts, these contacts appear in search results.
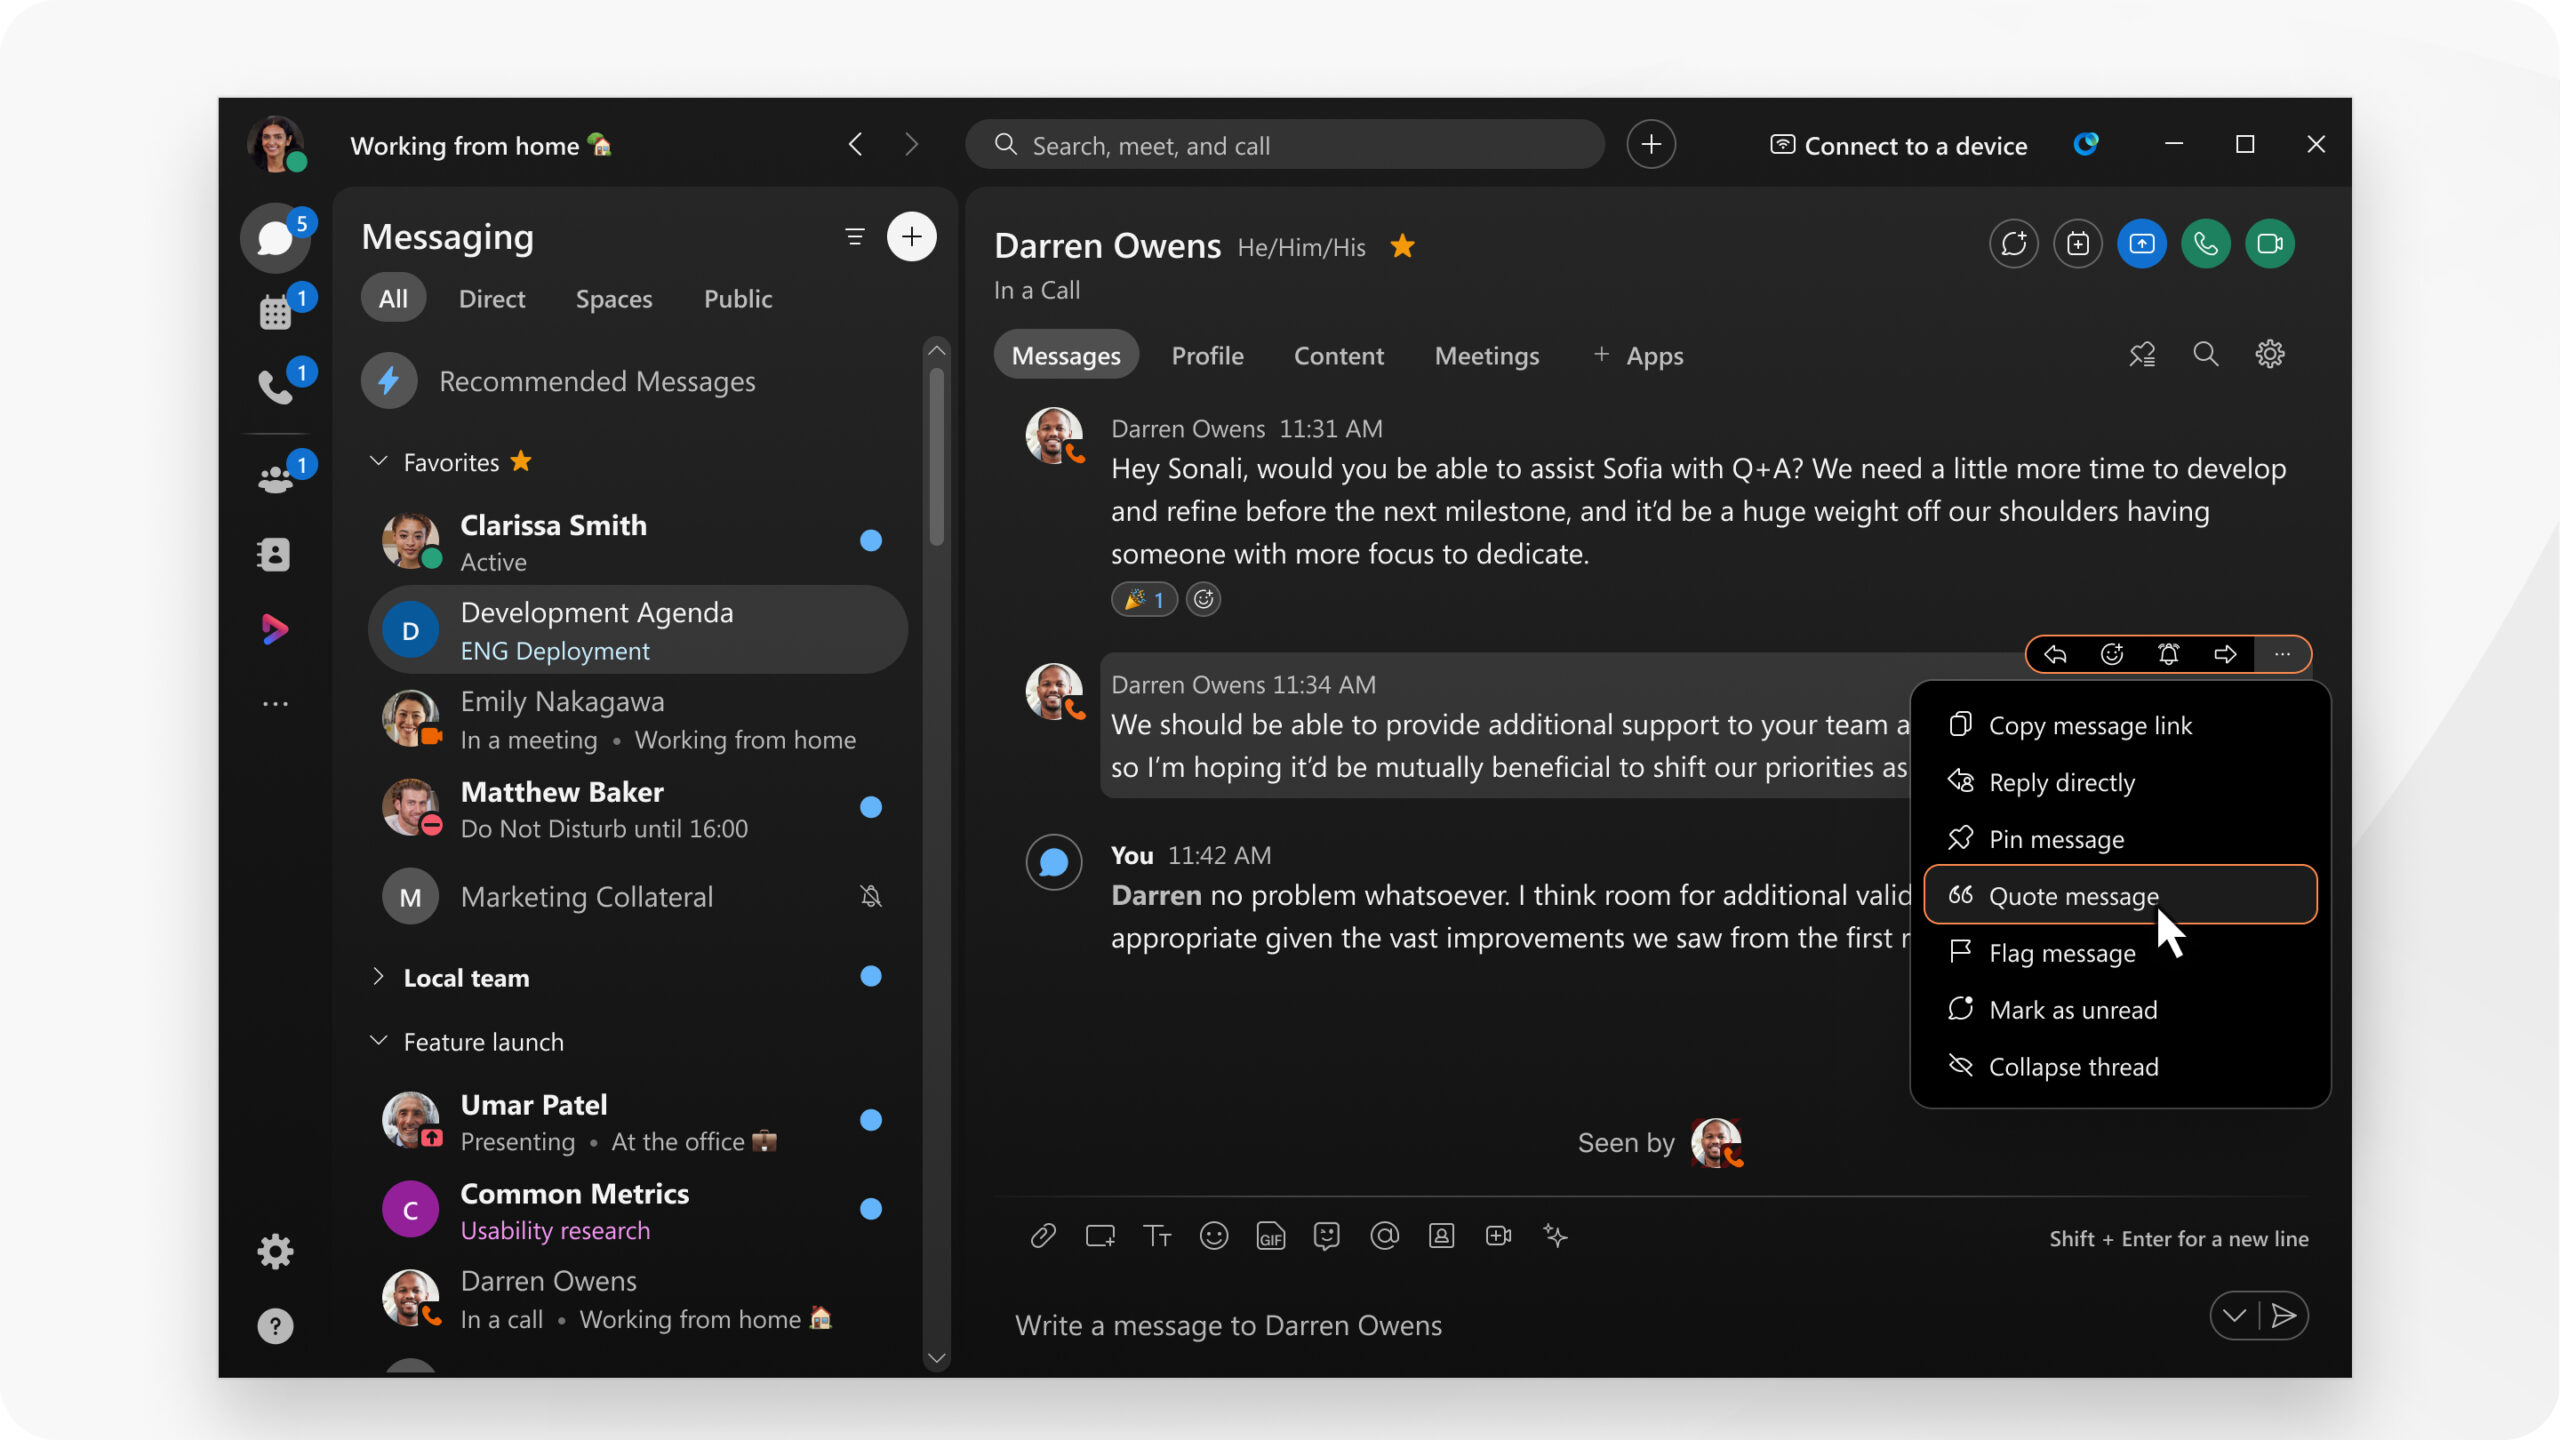
Quotes and threads are two special ways of replying to messages that help you keep conversations more focused. Both include context to help you navigate them in busy spaces.
Your spaces are filled with all the innovative and groundbreaking work (and cat GIFs) that your teams are doing every day. But, sometimes it’s hard to know whether someone was answering your question or talking about something else. You can quote messages or start threads to help keep track of messages.
Quotes
Quotes work great if you want to remind everyone of something that someone said or if you’re just answering someone’s specific question. It’s probably not anything that other people likely want to discuss. You can’t quote another quote so you’re not making it easy for other people to join in. But, that’s fine because not everything needs to be discussed. Think of it as restating a comment for emphasis or answering a who, what, where, when type of question.
So, use a quote when you want to:
1. reiterate someone’s previous comment for the group’s benefit.
2. answer specific who, what, where, when questions.
You can also see where a quoted message was originally posted. If you see a quoted message in a space, click or tap Go to message to see the original message in context.

Threads
When you start a thread, though, you’re opening up a discussion. You’re inviting other people to join in and have a focused conversation. Threads often focus on how and why questions that are more open-ended. People can reply to threads and share their opinions about this specific topic. (But, avoid derailing an ongoing thread with something off-topic. Just start a new discussion in the space instead.)
1. Start a thread if you want to:
2. reply with expectation that others will join.
3. participate in a targeted discussion with anyone in space.
4. answer how or why questions.
Add some fun to your content by including emojis in your messages. You can also add emojis to space and team names.
You can respond to someone’s message with an emoji reaction. You can use reactions to let people know that you like a post, to show excitement, or to have some fun.
You can share animated GIFs by accessing GIPHY directly from the app, so you can find just the right GIF to personalize your message. If you don’t see the GIF option, then your administrator has disabled it.
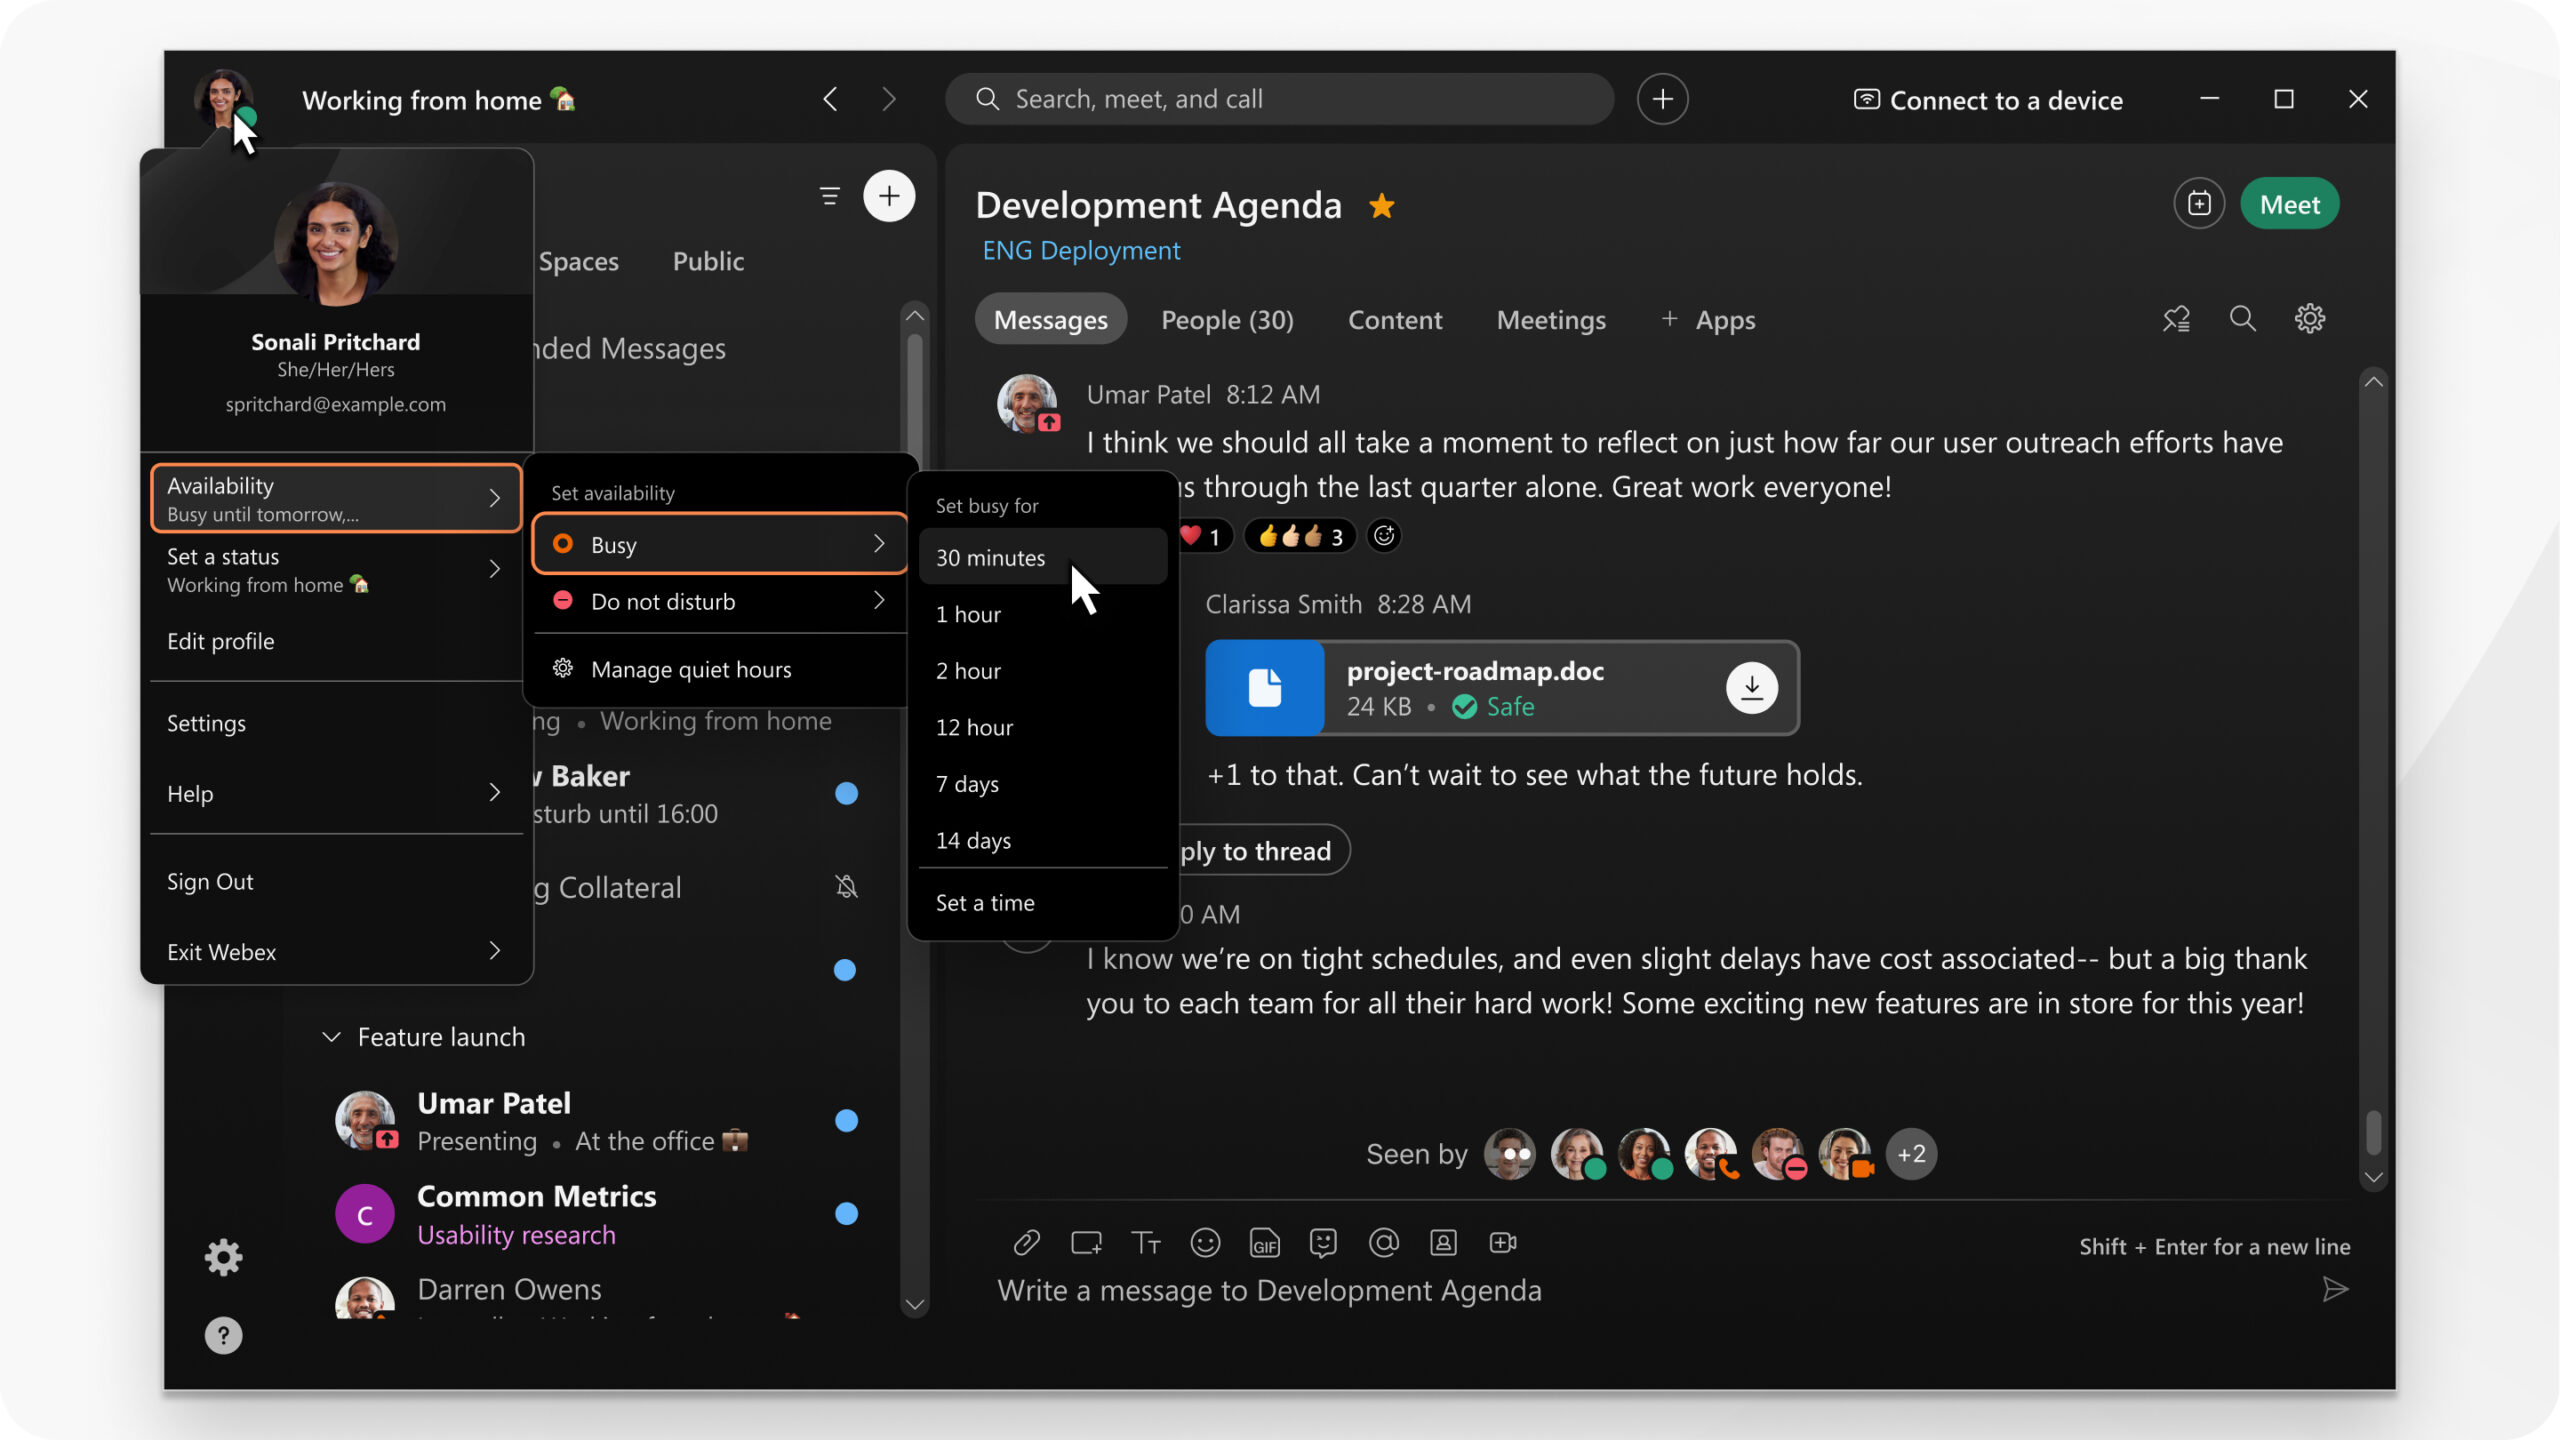
There are two ways to let your colleagues know you’re busy. If you need some time to work without getting message or call notifications, set your availability to Do Not Disturb (DND). If you need to let your colleagues know you’re focused on your work, but still see their messages and call notifications, set your availability to Busy.
When you set set your availability to Do Not Disturb, you wont get any notifications, but you’ll see your unread indicators, so you can see the messages you haven’t viewed.
When you set your availability to Busy, you’ll get all message and call notifications.
Notifications help you keep up to date with what’s happening, so you don’t miss anything. You can configure notifications globally, so the settings apply to all your spaces.
Webex App allows you to set notifications in two ways: globally so that the settings apply to all of your spaces or individually so the settings apply just to certain spaces. These settings work together to make sure you get notified about the messages that matter most to you.

With Webex App, you’re not limited to communicating only with people within your organization. If you’re working with other people, such as vendors or customers, you can invite them to collaborate with you in Webex App.
Of course, you’ll need an easy way to know when these people are included in these spaces so that you don’t accidentally share confidential information. You’ll see some areas in those spaces highlighted, like the border, message background, and icon in the message area and their email addresses.
Your company can apply policies to restrict you from inviting people from outside your organization and prevent you from joining spaces owned by another organization. You’ll get a message letting you know in these cases.
Sometimes you may want to control who can get added to a space. If so, you can start moderating the space to prevent others from adding people to the space. When you moderate a space on a team, people in the team can see the space but they must ask a moderator to be added to the moderated space.

Sometimes you need to share important information with your team, without the distraction from other conversations happening in the space. With Webex App, you can use announcement mode in any moderated space just for announcements.
When you turn on announcements for a space, the other people in the space get notified about the change.
When you make an announcement space, only moderators, bots, and integrations can post to it. Everyone else can just read the announcements, view files, and join meetings. System messages that show when people join or leave a space or delete messages still display too.
Keep everyone informed and engaged in Webex Meetings and Webex Webinars by sharing nearly any type of content. Share your entire screen, video from a camera, or specific files and applications that you choose.
Anyone in a meeting, as well as a presenter in a webinar or event, can share content up to 4k. If you move an open window over the shared application, nobody can see it, but you can show your camera video over the shared application.
The Share content window can be expanded or decreased to any size for purposes of showing as many applications as you need. When you click Share to open the Share content window, hover over the edge of the window and then click and drag to your preferred size.
Share your screen
When you share your screen, everyone can see what you see. If you have a Word document or a PowerPoint slide, or even a website or chat window open, they see it.
Before your meeting, mute notifications and close any personal or sensitive documents. This way, you don’t have to worry about accidentally sharing private or distracting information.
When sharing content, you can access the share toolbar by moving your mouse to where it says ‘You’re sharing this screen.’ A drop-down list shows your options. To hide it again, move the mouse away.
Click Share Share icon and select the screen that you want to share.
Share only a specific application
When you share a specific application, others can’t see anything other than the shared application. For example, if you have your browser and PowerPoint open and you choose to share PowerPoint, they can’t see the browser tabs. But if you have several PowerPoint presentations open, you can switch between them. If you move another application in front of the one you share, participants can still only see your shared application.
If you accidentally click on an application that’s not shared, they’ll still see only the application being shared.
Share an application, whether you have it open or not:
To share an open application, click Share Share icon and select an application from the list.
To share an application that you don’t have open, select Share Share icon > Other Applications, then click Share next to the application.
Share multiple applications
Share multiple applications from the Share content menu.
Click Share content.
Windows—hold Ctrl and select multiple applications.
Mac—hold Shift and select multiple applications.
Share a window from the taskbar
If you’re using Windows 11, share the window of any open application directly from the taskbar without having to select it from the sharing options in your meeting or webinar.
Hover over an application in your taskbar and click Share this window on the pop-up of the application window.
Share video content
Sharing video content is slightly different than sharing any other type of content. To handle this difference, meetings and webinars have an optimization selection specifically for motion and video.
Click Share icon, then select Optimize for motion and video from the drop-down list, and choose the screen or application you want to share.
Check the Share your computer audio box so that the video sound comes directly through the audio conference.
Share a file
Sharing files allows you to share a single file. It could be anything, like a document or video file stored on your computer.
If you already have the file open, share your screen or application. File sharing may not work when you’re trying to share a PowerPoint presentation with embedded video.
1. Click Share content, then select File > Next.
2. Choose the file that you want to share.
Your file opens in the meeting, webinar, or event window, where people in the meeting can collaborate on it.
Share a whiteboard
Share video from your camera
During a meeting or webinar, share your computer’s built-in camera or an external USB camera just like you share your desktop. When you share, participants can see whatever your camera sees. They can also still see your self-view.
You can’t share video from your camera in Events (classic).
1. Click Share , then select Camera.
2. Choose the camera that you want to share and click Share.
Your camera’s video appears in the meeting window.
3. (Optional) If you selected the wrong camera or want to change cameras, click Switch camera and choose a camera.
See what you’re sharing
When you’re sharing content, you want to make sure you share only what you want and that everyone in the meeting can see it. When you share your screen or an application, check what everyone else sees by opening a window that shows you what you’re sharing.
While sharing, go to the tab in the meeting control bar at the top of the screen and click the arrow.
To expand or collapse the control bar at the top of the screen, click the arrow. If the share control bar is covering the shared content, you can drag the bar to any other edge of the screen.
Limit distractions and maintain privacy around you by blurring or changing your background during your call or meeting. You can replace what shows behind you with a preset backround or one of your own.
In Webex Meetings and Webex Webinars, create a better experience by filtering out background noise, such as typing on your keyboard or your dog barking.
Our advanced deep learning, speech science, and audio processing technology separate noise from human speech in any language. Your colleagues will hear you and not the noises in your workspace.
This feature removes background noise when you Use computer audio only.
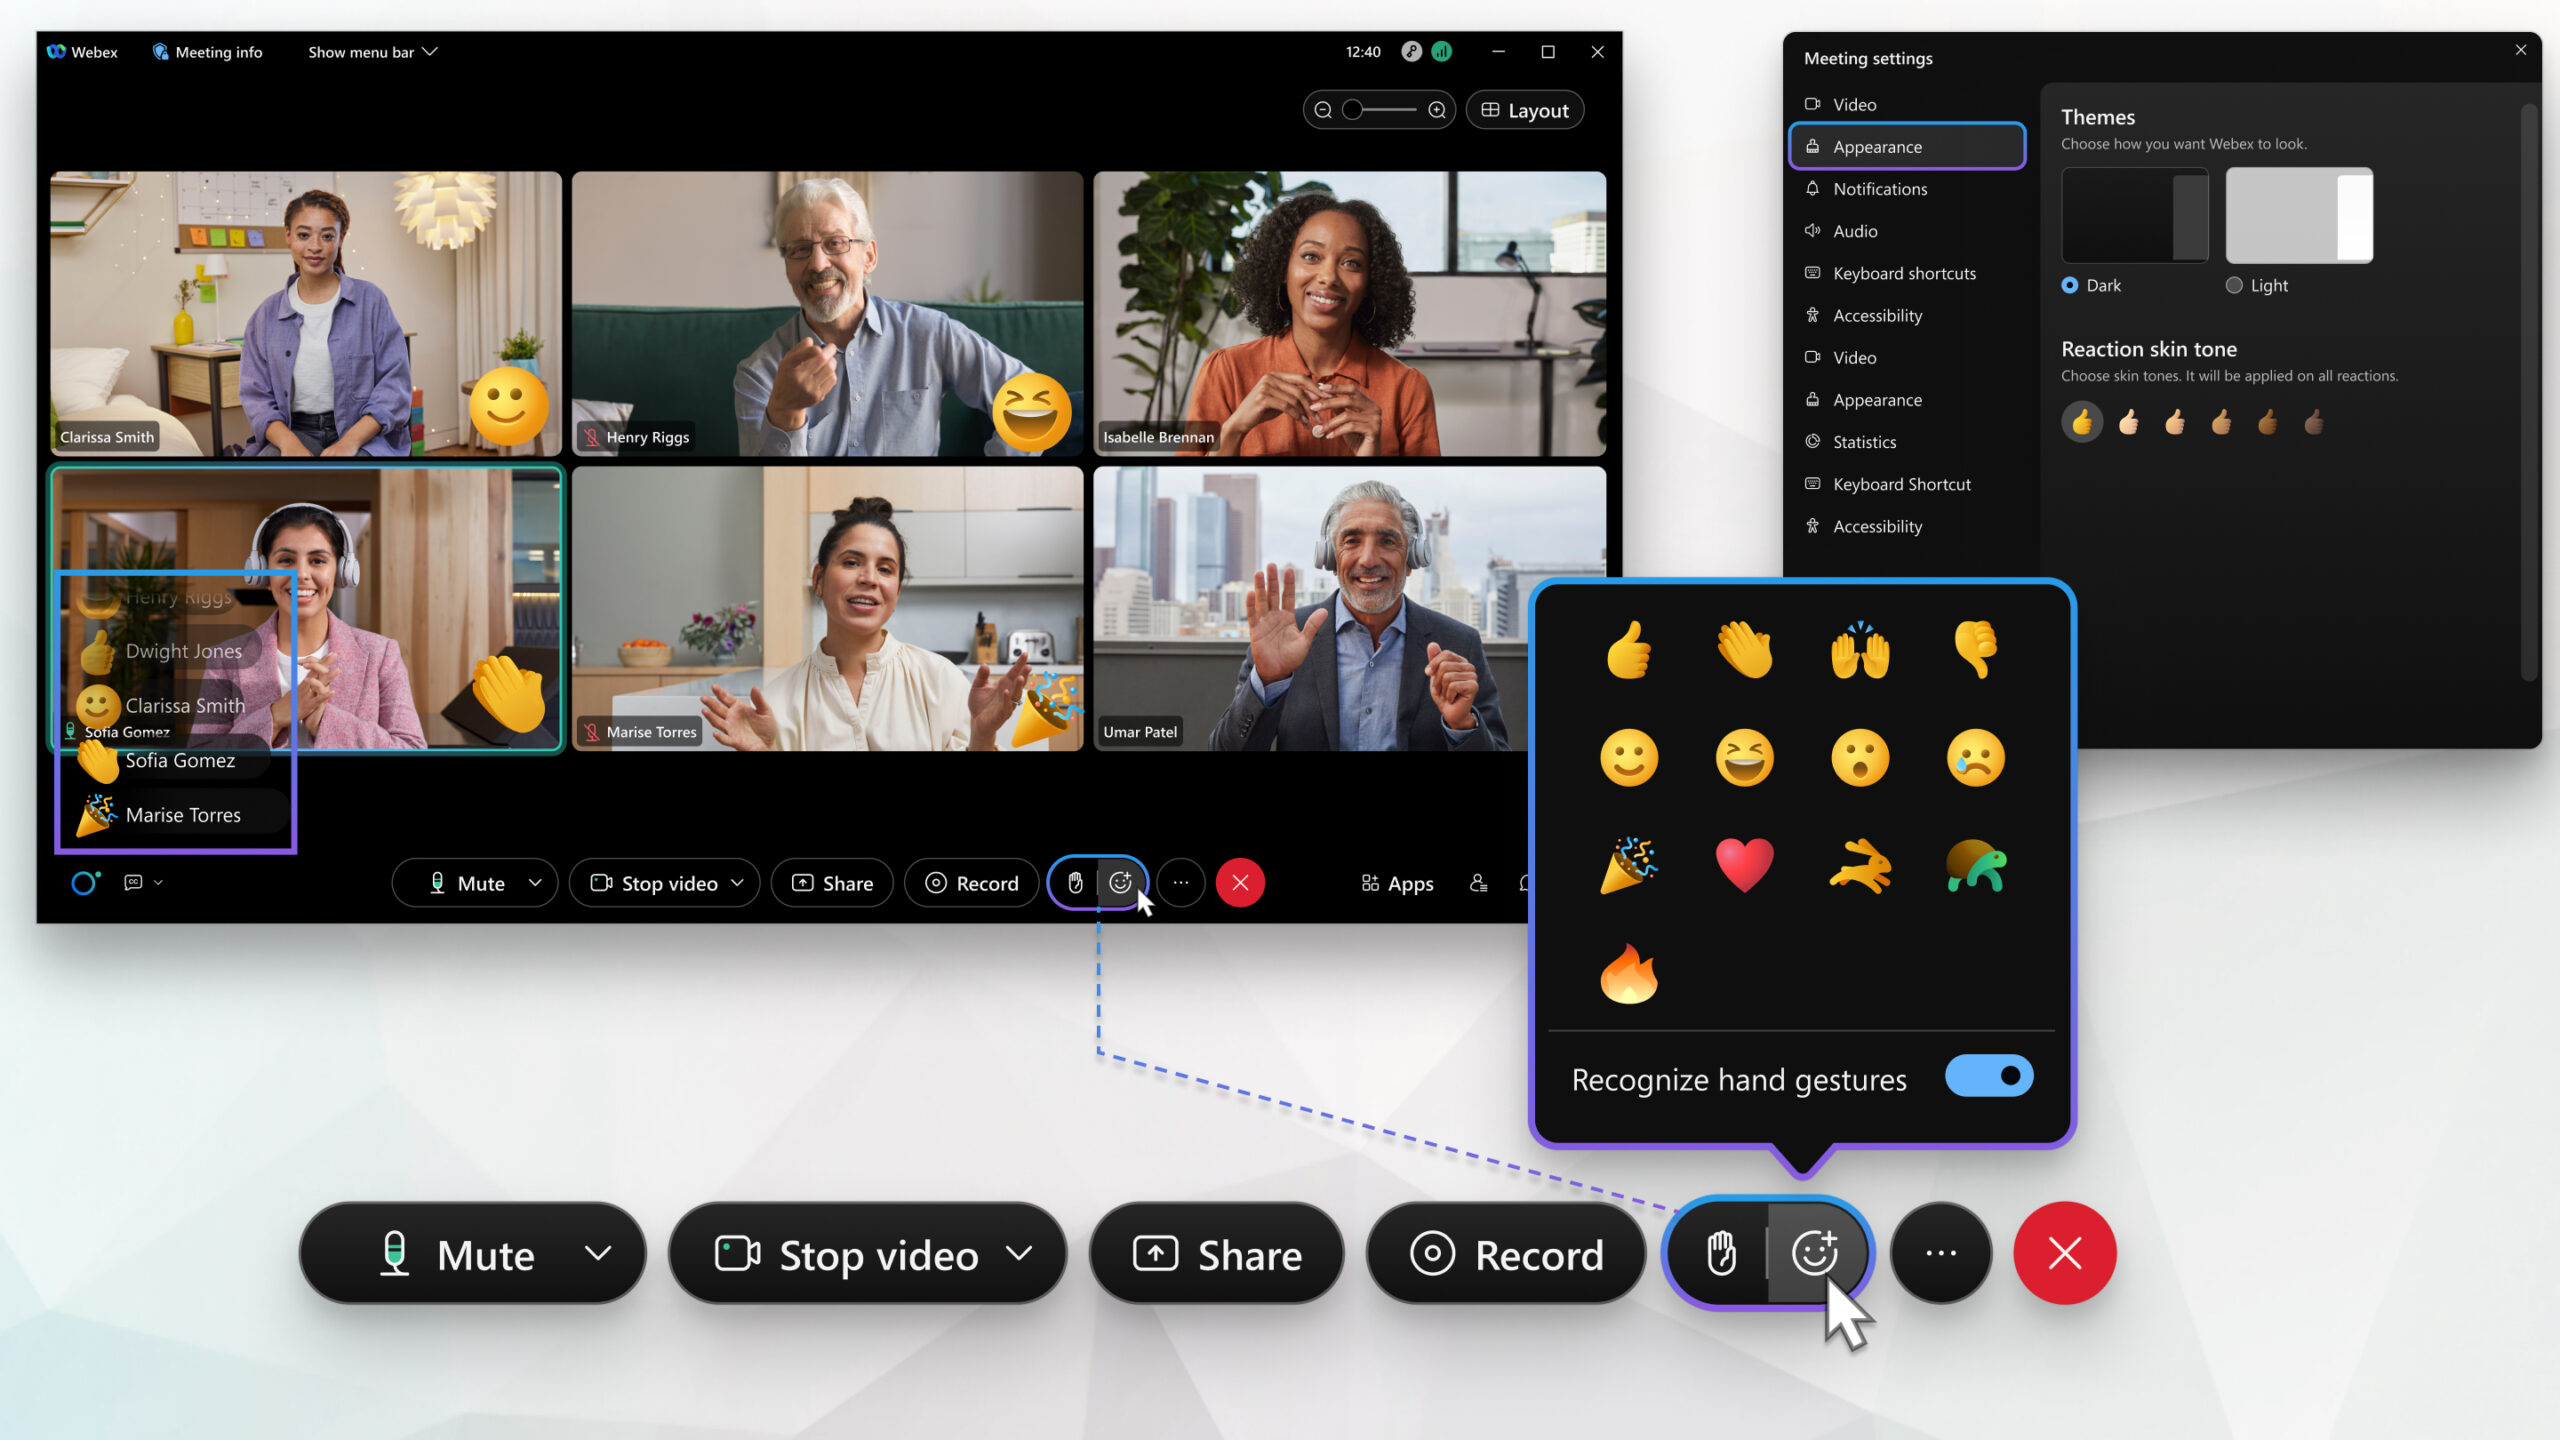
Animated reactions let participants express themselves without saying anything in a meeting, webinar, or breakout session. Cheer on the speaker with the clapping hands reaction, or appreciate a joke with the haha reaction. As a presenter, you can get a sense of the audience’s response by asking participants to give a quick thumbs up or thumbs down.
You can choose from 12 emojis to give instant feedback:
Thumbs up
Clapped hands
Celebrate
Smile
Haha
Wow
Sad
Thumbs down
Slow down
Speed up
Thanks
Fire
This feature is available for Meetings and Webinars. It’s not available for webinars in webcast mode.
In a meeting, anyone can start a whiteboard and begin two-way collaboration across some video system devices and Webex App participants, on an infinite canvas.
Board Series and Desk Series devices support this feature. Webex DX Series devices aren’t supported. When a whiteboard is shared by another participant in a meeting, the DX device receives a one-way, noninteractive view of the whiteboard. However, it’s still possible to create whiteboards with fewer tools with the DX Series devices, and share them in meetings.
You can also annotate shared documents during a meeting, instead of creating a whiteboard.

As a host or cohost in Webex Meetings or Webex Webinars, use polls to create and share questionnaires. Polls can be useful for gathering feedback, taking votes, or testing knowledge.
You can also create polls in Slido, including polls before the meeting or webinar begins.
To use polls in your meeting or webinar, turn polling on in Advanced options > Scheduling options > Meeting options or Advanced options > Scheduling options > Webinar options.

Breakout sessions are smaller groups that are split off from the main meeting or webinar. Use breakout sessions for workshops, classrooms, or for when you need a moment to talk privately with a few participants outside of the main session.
Schedule a meeting from the Meetings calendar when you want to schedule a one-time meeting link or a personal room meeting. You can also make sure that your meetings are end-to-end encrypted.
You or anyone you assign as a cohost can start the meeting, invite people to it, start breakout sessions, record the meeting, and share the recording.
End-to-end encryption for Webex App meetings
Scheduled meetings support end-to-end encryption. For more information on how to encrypt all your meetings by default, see Webex App | Set end-to-end encryption for meetings.
The Webex Scheduler you schedule Webex meetings or Webex Personal Room meetings directly from Microsoft Outlook, in any browser. The calendar invite shows the Webex meeting details, including a link to join the meeting.
Record meetings or events on your computer for people who can’t attend or for those who want to refer back to what was discussed.
As the host, you can record meetings on your computer if your site administrator has allowed local recording for your site.
Your recordings include the participant audio, video, and anything shared during the meeting.
Recording format
Recordings save to your computer in the MP4 format.
Recordings don’t include the panels, such as the chat panel and participants panel, transcripts, or any files that you share using Share File. You can’t choose a recording layout.
Recording location
When you record a meeting to your computer, you can choose where you want to save it, or you can save it to the default path.
For Windows: Recordings save to the Documents folder in My Computer by default.
Always save recordings to a local folder on your computer. Don’t save recordings to a network file location since you can’t play back recordings from a network file location.
For Mac: Recordings save to the Home folder by default, which you can access with Finder.
Allow anyone with the presenter role to record (Webex Training)
If your site administrator allows recording in the WRF format (Windows only) for Training, you can let a participant record the training session by making them the presenter. Once you make a participant the presenter, the Recorder icon appears in their session controls. As the host, you can’t start a new recording on your computer until you make yourself the presenter again. You can still record in the cloud. If you already started recording on your computer and then make someone else the presenter, the new presenter can start a recording without stopping yours.
Record your meeting
1. Click Record and select the option for your computer.
Don’t see the computer option? The option may be disabled. Contact your Webex site administrator.
If you subscribe to Webex from your Service Provider, please direct questions about this feature to your Provider’s customer support team.
To include audio in your recording, you must select Computer audio as the audio option. If you connected to audio using a different option, a warning appears, but you can still record without sound.
2. Click Record.
3. (Optional) Click Record, and then choose Pause and Resume to maintain a single recording.
For meetings or events that last many hours, it’s a good idea to make multiple recordings for more manageable file size and easier viewing.
4. Click Stop to end your current recording.
When the meeting or event ends, your recording saves to your computer.
Webex Assistant for meetings and webinars is an intelligent, interactive virtual assistant that makes meetings and webinars searchable, actionable, and more productive. You can ask Webex Assistant to follow up on action items, take note of important decisions, and highlight key moments during a meeting or webinar.
Webex Assistant is available in Webex Meetings, Webex Webinars, and Webex App.
Webex Assistant supports hosts only for webinar in webcast view, Webex for Government, or for meetings started or joined from a space in Webex App.
Webex Assistant for Meetings responds to everyone in a meeting or webinars whereas Webex Assistant for devices responds to people in the room only.
Webex Assistant in a meeting or webinar responds to voice commands such as taking meeting highlights, action items, and notes.
Webex Assistant on room devices responds to meeting control-focused voice commands such as “Join my Personal Room,” “End the meeting,” and “Turn up the volume.”
Webex Assistant requires Cisco Webex video platform version 2.0 with joining meetings from video systems enabled. Find your Webex Meetings version number.
Automatically transcribe the audio of your meetings and webinars that you record in the MP4 format. The transcript displays when you play the recording, and you can search the transcription to verify when something was said.
Transcriptions are only available in English for Webex.
1. Sign in to User Hub.
2. Go to Settings > Meetings > Recording and toggle on Create recording transcripts for all my MP4 recordings.
If you don’t see this option, either your site administrator chose to create transcripts automatically for all recordings, or doesn’t allow you to create recording transcripts automatically.
As a host, you can assign the cohost role to one or more attendees during a meeting. A cohost can help manage the meeting, especially when there are many attendees.
You can assign an attendee the cohost role during a scheduled meeting, a Personal Room meeting, and an enhanced meeting associated with a space.
For enhanced meetings associated with a space, people internal to the organization are automatically made cohosts during scheduling. They need an account with host privileges on the site where the meeting is scheduled from. External members of the space can only be made hosts or cohosts after the meeting starts.
When you make someone a cohost of a meeting, you’re letting them:
Mute and unmute all or specific attendees
Record the meeting
Admit people from the lobby
Remove an attendee from a meeting
Lower a raised hand
Assign the presenter role to another attendee
End the meeting
Cohosts who you assign when you schedule meetings from your Webex site can also start a meeting.
Allow another host on your Webex site to schedule meetings or training sessions for you. This feature is useful when you’re unable to reach a computer or when you’re too busy to do it yourself.
1. Sign in to User Hub.
2. Go to Settings > Meetings > Scheduling.
3. In the Scheduling permission box, type the email addresses of the hosts that you want to allow to schedule for you.
Separate multiple addresses with either a comma or semicolon.
You can select a maximum of 20 hosts.
4. (Optional) To grant your delegates access to post meeting content, such as recordings, transcripts, highlights, and attendance reports, check Automatically share meeting content with my delegates.
Delegates receive an email after the meeting ends with a link to the meeting content, or they can go to the meeting content from User Hub. If a delegate schedules a meeting, the meeting content still gets shared to all delegates.
5. Click Save.

When you’re sharing your screen in the desktop app, you can give someone access to your mouse and keyboard to control your computer. You can also request access keyboard and mouse control while they’re sharing their screen. This can useful for Training sessions, collaborating on a document with someone, or while troubleshooting an issue.